How to Prepare Your Home's Exterior for Painting After Winter Damage
What Winter Does to Your Home's Exterior
Winters in Norristown and the surrounding Montgomery County area are tough on painted surfaces. Freeze-thaw cycles, ice, and moisture work together to break down even well-applied paint over time.
By the time spring arrives, many homeowners are looking at surfaces that are in worse shape than they realized. The damage tends to show up in a few predictable ways.
- Peeling or bubbling paint caused by moisture trapped beneath the surface
- Hairline cracks in siding, trim, or caulk joints that opened up during freezing temperatures
- Chalking or fading from repeated exposure to ice, snow, and winter UV
- Wood rot or soft spots where water sat and soaked in over the season
- Mold and mildew growth in shaded or north-facing areas
Skipping past these issues and painting directly over them is one of the most common mistakes homeowners make. It leads to premature failure, usually within a season or two.
Why Prep Work Determines How Long Your Paint Job Lasts
Paint is only as good as the surface underneath it. A quality exterior coating applied over dirty, cracked, or unstable surfaces will fail early, no matter the brand or price point.
Proper preparation removes the barriers to adhesion and gives the new coating a clean, stable foundation to bond to. That is what separates a paint job that lasts three years from one that lasts ten or more.
In this region, where humidity in spring and summer follows a harsh winter, getting prep right is especially important. Moisture is the number one enemy of exterior paint, and prep is how you address it before it causes problems.
Step 1: Inspect the Surface Carefully
Before any work begins, do a thorough walkthrough of your home's exterior. Look closely at siding, trim, window frames, soffits, and any areas where two materials meet.
- Press on wood surfaces to check for soft spots or rot
- Run your hand along painted areas to check for chalking or loose paint
- Look for gaps in caulk around windows, doors, and trim joints
- Check corners and low-lying areas where water tends to collect
Document what you find. Knowing the scope of the damage helps you plan the right repairs before any paint goes on.
Step 2: Power Wash the Entire Surface
Power washing is not optional. It removes dirt, mildew, chalk, and loose paint that would otherwise prevent proper adhesion.
For surfaces showing mold or mildew, a cleaning solution with a mildewcide should be used during the wash. Plain water alone will not kill mildew spores, and painting over active mildew causes it to bleed through and spread under the new coat.
After washing, allow the surface to dry completely before moving on. In spring conditions around Norristown, that typically means waiting at least 48 hours, sometimes longer, depending on shade and humidity levels.
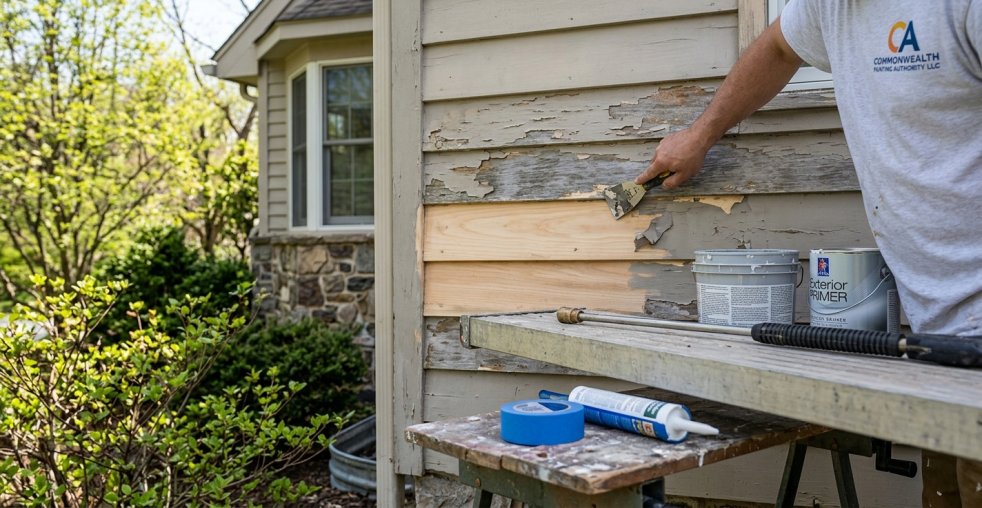
Step 3: Scrape, Sand, and Repair
Once the surface is dry, it is time to address all failing paint and damaged areas by hand.
- Scrape off all peeling, flaking, or bubbling paint down to a stable layer
- Sand edges smooth so there are no ridges or lips where new paint could peel
- Fill cracks in wood or siding with an appropriate exterior filler
- Replace any caulk that has cracked, pulled away, or lost flexibility
- Address any wood rot with epoxy filler or replace boards that are beyond repair
This step takes time, and it is where many DIY projects fall short. Rushing through scraping and repairs is the most reliable way to end up with a paint job that peels within a year.
Step 4: Prime Before You Paint
Priming is not just for bare wood. Any area where paint was removed, where repairs were made, or where the surface is porous or stained should receive a coat of primer before the finish coat goes on.
For bare wood, a slow-drying alkyd primer provides strong penetration and adhesion. For surfaces with heavy staining or tannin bleed, a stain-blocking primer prevents discoloration from showing through the topcoat.
Skipping primer to save time or money almost always costs more in the long run. Primer is what locks everything in and gives the finish coat something solid to grip.
Choosing the Right Time to Paint
Even after thorough prep, timing matters. Exterior paint should be applied when temperatures are consistently above 50 degrees Fahrenheit, and rain is not expected for at least 24 hours after application.
In the Norristown area, late April through early June is often the ideal window. Temperatures are mild, humidity is manageable, and surfaces have had time to dry out from winter moisture.
When to Call a Professional
Some exterior prep work is straightforward. Other situations, including significant wood rot, extensive peeling across multiple surfaces, or moisture damage that has worked its way into the structure, call for experienced hands.
Commonwealth Painting Authority LLC has worked on homes throughout the Norristown and Montgomery County area and understands what Pennsylvania winters do to exterior surfaces. Our process starts with honest assessment and thorough preparation, because we know that is what makes the finish last.
If your home's exterior took a beating this past winter, contact Commonwealth Painting Authority LLC today to schedule a free estimate. Call us at (610) 424-4900 and let's talk about what your home needs to look great and stay protected for years to come.